
Introduction
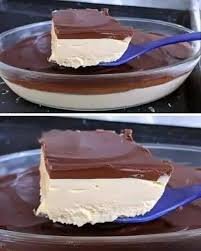
If you love chocolate desserts but do not want to turn on the oven, this easy no-bake chocolate dessert is a perfect choice. It has a buttery biscuit base, a smooth cream cheese filling, and plenty of rich chocolate flavor in every bite. The best part is that the dessert comes together without baking, so it is simple enough for beginners and convenient when you need a quick sweet treat.
This dessert is soft, creamy, and rich, with a little crunch from the biscuit base and chocolate chips on top. It can be made ahead of time and stored in the refrigerator, making it a great option for family dinners, parties, holidays, birthdays, or weekend gatherings.
The recipe uses simple ingredients that are easy to find. You can also change the toppings or add your favorite chocolate to make it your own.
Why You Will Love This Dessert
There are many reasons to keep this recipe in your dessert collection. First, there is no oven involved, which makes it especially useful during hot weather. Second, the preparation is simple and requires only a few basic ingredients. The dessert also looks beautiful when sliced and served chilled.
The creamy filling pairs perfectly with the buttery biscuit crust. Chocolate adds a deep, rich taste without making the recipe complicated. Once everything is prepared, the refrigerator does most of the work.
Ingredients
For The Biscuit Base
- 2 cups crushed biscuits
- ½ cup melted butter
For The Chocolate Filling
- 1 cup whipped cream
- 1 cup cream cheese
- ½ cup powdered sugar
- 1 cup melted chocolate
For The Topping
- Chocolate chips as needed
- Extra melted chocolate, optional
- Chocolate shavings, optional
1. Prepare The Biscuit Base
Start by crushing the biscuits until they become fine crumbs. You can use a food processor, blender, or place the biscuits in a sealed bag and crush them with a rolling pin.
Transfer the crumbs to a bowl and pour in the melted butter. Mix thoroughly until the crumbs are evenly coated and the mixture looks like wet sand.
The butter helps hold the biscuit crumbs together once the dessert is chilled. If the mixture seems very dry, add a small amount of melted butter, but avoid adding too much because the base should remain firm rather than greasy.
2. Press The Base Into The Dish
Choose a suitable baking dish, glass container, or removable-bottom pan. Pour the biscuit mixture into the bottom and spread it out evenly.
Use the back of a spoon, the bottom of a glass, or a flat measuring cup to press the crumbs down firmly. Make sure the surface is level so the filling sits evenly on top.
Place the dish in the refrigerator for about 15 minutes while you prepare the chocolate filling. Chilling the base helps it firm up and makes it easier to spread the creamy layer without disturbing the crust.
3. Prepare The Cream Cheese Mixture
Place the cream cheese in a clean mixing bowl. Add the powdered sugar and beat them together until the mixture becomes smooth and creamy.
Make sure the cream cheese is softened before mixing. Soft cream cheese blends more easily and helps prevent lumps in the filling.
Once the mixture is smooth, gradually add the whipped cream. Fold or mix gently until everything is combined and the filling becomes light and creamy.
Avoid overmixing because you want the filling to stay smooth and airy.
4. Melt The Chocolate
Break the chocolate into small pieces and melt it gently. You can use a microwave in short intervals, stirring between each interval, or melt it over a bowl of warm water.
The chocolate should become completely smooth with no large pieces remaining. Allow it to cool slightly before adding it to the cream mixture.
Do not add extremely hot chocolate directly to the cream cheese mixture because it may affect the texture.
5. Add The Chocolate
Slowly pour the melted chocolate into the cream cheese and whipped cream mixture.
Stir gently until the chocolate is fully incorporated and the filling turns smooth and evenly chocolate-colored.
Scrape the sides and bottom of the bowl while mixing so that no plain cream cheese mixture remains unmixed.
At this point, the filling should look thick, creamy, and rich.
6. Assemble The Dessert
Remove the chilled biscuit base from the refrigerator.
Spoon the chocolate filling over the crust and spread it carefully with a spatula or the back of a spoon. Work slowly so the biscuit layer stays intact.
Smooth the top as evenly as possible. If you want a more decorative finish, you can create gentle swirls with a spoon or spatula.
7. Add The Toppings
While the chocolate filling is still soft, sprinkle chocolate chips over the surface.
You can also add chocolate shavings, grated chocolate, crushed biscuits, or a light drizzle of melted chocolate.
For a more elegant dessert, decorate each serving with a small amount of whipped cream and a few chocolate curls.
The topping is flexible, so feel free to use whatever chocolate ingredients you already have at home.
8. Chill Until Firm
Cover the dessert with plastic wrap or a suitable lid and place it in the refrigerator.
Allow it to chill for at least 3 to 4 hours. For the best results, you can leave it refrigerated overnight.
Proper chilling is important because it allows the filling to become firm enough to cut into neat portions.
Avoid trying to slice the dessert too early because the filling may still be soft.
9. Slice And Serve
Once the dessert has fully set, remove it from the refrigerator.
Use a sharp knife to cut it into squares or slices. For cleaner cuts, wipe the knife between slices.
Serve the dessert cold and enjoy the combination of creamy chocolate filling and buttery biscuit crust.
If desired, add a little whipped cream or extra chocolate on each serving just before serving.
Tips For The Best No-Bake Chocolate Dessert
Use Good-Quality Chocolate
Since chocolate is one of the main flavors, using chocolate that you enjoy eating can make a noticeable difference. Milk chocolate gives a sweeter taste, while dark chocolate creates a deeper and richer flavor.
Soften The Cream Cheese
Allow the cream cheese to soften before mixing. This makes it much easier to create a smooth filling without lumps.
Do Not Skip The Chilling Time
The refrigerator is what helps the dessert set properly. Give it at least 3 to 4 hours, and overnight chilling is even better when you have enough time.
Press The Biscuit Base Firmly
A loose biscuit crust can crumble when you cut the dessert. Press the crumbs firmly into the dish to create a solid base.
Let Melted Chocolate Cool Slightly
Melt the chocolate until smooth, then allow it to cool for a short time before mixing it with the cream filling. This helps maintain a smooth texture.
Easy Variations
You can easily change this recipe to create different flavors.
For a chocolate peanut butter version, swirl a few spoonfuls of smooth peanut butter over the chocolate filling before chilling.
For a cookies and cream dessert, replace part of the crushed biscuits with chocolate sandwich cookies and sprinkle crushed cookies over the top.
For a dark chocolate version, use good-quality dark chocolate in the filling and add dark chocolate shavings as a topping.
For a caramel chocolate dessert, drizzle caramel sauce over the finished dessert before serving.
You can also add chopped hazelnuts, almonds, walnuts, or toasted coconut for extra texture.
How To Store It
Keep the dessert covered and refrigerated until ready to serve. It is best enjoyed chilled.
Store leftovers in an airtight container or cover the dish tightly. The dessert should be kept refrigerated and can be enjoyed over the next few days.
Because this is a cream-based dessert, avoid leaving it at room temperature for long periods, especially during warm weather.
Frequently Asked Questions
Can I Make This Dessert Ahead Of Time?
Yes. This dessert is ideal for preparing ahead. Making it the night before gives the filling plenty of time to firm up and allows the flavors to blend together.
Do I Need To Bake The Biscuit Base?
No. The biscuit base is made with crushed biscuits and melted butter, then chilled in the refrigerator. No baking is required.
Can I Use Different Biscuits?
Yes. Plain tea biscuits, digestive biscuits, chocolate biscuits, or similar cookies can work well. The flavor of the biscuits will slightly change the final dessert.
Can I Use Dark Chocolate?
Absolutely. Dark chocolate works very well if you prefer a less sweet and more intense chocolate flavor.
Why Is My Filling Too Soft?
The most common reason is not chilling the dessert long enough. Make sure it stays refrigerated for at least 3 to 4 hours. Also, allow melted chocolate to cool slightly before combining it with the filling.
Serving Ideas
This dessert looks great served in simple squares or slices. For a special occasion, place each slice on a small dessert plate and add whipped cream, chocolate curls, berries, or a light chocolate drizzle.
You can also prepare the recipe in individual glasses instead of one large dish. Simply layer the biscuit crumbs and chocolate filling in small cups and chill them until firm.
Final Thoughts
This easy no-bake chocolate dessert is a simple way to make a rich and creamy treat without using an oven. The combination of buttery crushed biscuits, smooth cream cheese, fluffy whipped cream, and melted chocolate creates a dessert that is both easy and impressive.
With only a little preparation and a few hours of chilling, you can have a delicious chocolate dessert ready for your family or guests. Add your favorite toppings, experiment with different chocolates, and create your own version of this simple no-bake favorite.
