
This heritage-style sourdough loaf has a crisp, golden crust and a soft, chewy center. Rye flour adds a warm, earthy taste, while a long cold ferment gives the bread a deep flavor. You can bake it as a plain rustic loaf or add cinnamon raisins, roasted garlic, rosemary, and Asiago cheese for a flavorful twist.
The dough is easy to work with, but it does need time. The slow rise and overnight chill are what help create a loaf with good texture and flavor.
Ingredients
- 375g warm water
- 80g cold sourdough discard
- 450g bread flour
- 50g rye flour
- 11g fine sea salt
- Rice flour, for dusting
- All-purpose flour, as needed for shaping
You can replace the sourdough discard with active sourdough starter. If using active starter, make sure it is bubbly and has recently been fed.
Equipment
- Large mixing bowl
- Dough scraper
- Kitchen scale
- Banneton or proofing basket
- Clean kitchen towel
- Dutch oven
- Parchment paper
- Bread lame or sharp razor
- Wire cooling rack
Step 1: Mix the Dough
Add the warm water to a large bowl. Stir in the sourdough discard until it is mostly mixed into the water.
Add the bread flour, rye flour, and salt. Mix with your hand or a dough whisk until all of the flour is moistened. The dough will look rough and sticky at first. That is normal.
Cover the bowl and let the dough rest for about 30 minutes.
This short rest gives the flour time to absorb the water and makes the dough easier to handle.
Step 2: Build Strength With Stretch and Folds
After the first rest, begin the stretch-and-fold process.
Grab one side of the dough, gently stretch it upward, then fold it over the center. Turn the bowl and repeat on the other sides.
Complete one round, then cover the dough and let it rest for 30 minutes.
Repeat this process three more times.
You should have four rounds of stretch and folds in total.
As the dough develops, it should become smoother, stronger, and more elastic. Try not to tear or pull the dough too hard.
After the final fold, cover the bowl and allow the dough to continue rising at room temperature.
Step 3: Let the Dough Rise
Keep the dough in a warm room, ideally around 68–75°F.
Instead of relying only on the clock, watch the dough. It should rise by roughly 50–75% and show small bubbles around the surface and sides of the bowl.
The dough should feel soft and slightly springy when gently pressed.
The exact rise time can change based on room temperature and starter strength. A cooler room will take longer, while a warm room can speed things up.
Step 4: Pre-Shape the Loaf
Lightly flour your work surface.
Turn the dough out onto the counter. Use a dough scraper to help shape it into a loose round.
Fold the dough gently underneath itself while turning it. The goal is to create some surface tension without pressing all the air out.
Let the dough rest uncovered for about 30 minutes.
This bench rest allows the gluten to relax before the final shaping.
Step 5: Final Shape
Dust a round banneton generously with rice flour.
Gently shape the dough into a tight round. Use your hands or a bench scraper to create enough tension on the outside of the loaf.
Place the shaped dough into the banneton with the seam facing upward.
Cover the basket with a clean towel or food-safe cover.
Step 6: Cold Ferment
Place the covered banneton in the refrigerator.
For a mild flavor, cold ferment for about 24 hours. For a stronger and more tangy loaf, you can extend the cold fermentation to 48 hours.
Keep an eye on the dough during a long ferment. If it becomes very soft, spreads quickly, or looks heavily fermented, it is ready to bake.
Step 7: Prepare the Oven
When you’re ready to bake, place your Dutch oven inside the oven.
Preheat to 450°F (230°C) for at least 40–45 minutes.
A fully heated Dutch oven helps the loaf rise well and gives the crust a deep golden color.
You do not need to add a separate pan of water when baking in a covered Dutch oven. The moisture released from the dough becomes trapped inside the pot and creates steam.
Step 8: Score the Dough
Remove the dough from the refrigerator.
Place a sheet of parchment paper over the banneton. Carefully turn the dough onto the parchment.
Dust the surface lightly with rice flour if you want a clean, rustic look.
Use a bread lame or sharp razor to score the loaf. A simple single slash works well, but you can also create a decorative pattern.
If making a detailed design, lightly mark the pattern first with a toothpick or very light cuts.
Step 9: Bake
Carefully lower the dough into the hot Dutch oven using the parchment as a sling.
Cover the pot and bake for about 30 minutes.
Remove the lid and continue baking for another 20–25 minutes, or until the crust is deep golden brown.
For a well-baked loaf, the center should reach about 205–210°F (96–99°C).
If the crust is getting too dark before the center is done, reduce the oven temperature slightly and continue baking.
Step 10: Cool Before Slicing
Remove the bread from the Dutch oven and place it on a wire rack.
Let it cool completely before slicing. Ideally, give it at least 3–4 hours.
It may be tempting to cut into the loaf right away, but the inside continues to set as it cools. Cutting too early can make the crumb gummy.
Once cool, slice with a serrated bread knife.
Optional Flavor Add-Ins
The plain loaf is great on its own, but this dough also works well with sweet or savory additions.
Add your chosen ingredients during the final shaping stage.
Cinnamon Raisin Sourdough
For a sweet loaf, use:
- 80g raisins
- 4 tbsp unsalted butter, softened
- 4 tbsp brown sugar
- 2½ tsp ground cinnamon
Soak the raisins in warm water for about 1 hour. Drain and pat them completely dry.
Mix the softened butter, brown sugar, and cinnamon into a spreadable paste.
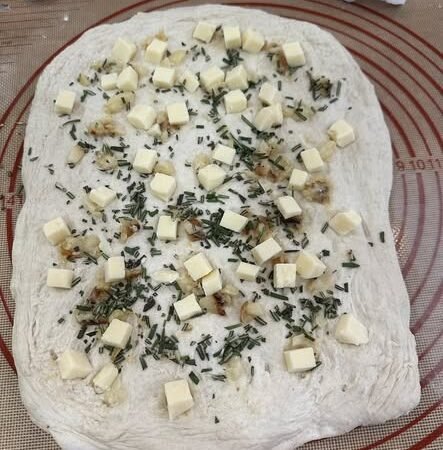
During final shaping, gently stretch the dough into a rectangle. Spread the cinnamon mixture over the dough, then scatter the raisins evenly across the surface.
Roll or fold the dough carefully, then shape it into a round.
Place it seam-side up in the prepared banneton and continue with the cold fermentation and baking steps.
Asiago, Roasted Garlic & Rosemary Sourdough
For a rich savory loaf, try:
- 3–4 heads garlic
- Olive oil
- 2–4 fresh rosemary sprigs
- Diced Asiago cheese
To roast the garlic, cut the tops from the garlic heads. Drizzle with a little olive oil and wrap loosely in foil.
Roast at 350°F (175°C) for about 45–60 minutes, or until the cloves are soft and golden.
Let the garlic cool, then squeeze the cloves from their skins and chop them.
During final shaping, gently add the roasted garlic, chopped rosemary, and diced Asiago cheese.
Avoid adding too many inclusions at once because a heavy filling can make shaping harder and may weaken the dough.
Place the shaped loaf into the banneton and refrigerate for 24–72 hours, depending on how much fermentation you want.
Bake using the same Dutch oven method.
Tips for the Best Sourdough Loaf
Use a Kitchen Scale
Bread is much more consistent when ingredients are weighed in grams. Flour can vary greatly when measured by cups.
Don’t Rush the Fermentation
Sourdough needs time. The dough may rise faster in a warm kitchen and slower in a cool one. Look at the dough instead of following the clock alone.
Don’t Over-Flour
Too much flour can make the dough dry and can prevent the crust from sealing well. Use just enough flour to keep the dough from sticking badly.
Dry Your Add-Ins
Raisins and roasted garlic should not be wet when added to the dough. Extra moisture can change the dough texture.
Preheat the Dutch Oven
A hot Dutch oven gives the dough a strong burst of heat when it first goes into the oven. This helps create a better rise and crisp crust.
Let the Bread Cool
Give the loaf plenty of time to cool before cutting. This helps the crumb finish setting and gives you cleaner slices.
Storage
Keep the cooled loaf at room temperature in a bread bag or paper bag for up to 3 days.
For longer storage, slice the bread and freeze it in an airtight freezer bag. Individual slices can be taken out as needed and warmed in a toaster or oven.
If you made the cinnamon raisin version, it is especially good toasted with butter.
Serving Ideas
This sourdough bread can be served in many ways:
- Toast with butter and honey
- Eggs and avocado on sourdough toast
- Grilled cheese sandwiches
- Garlic toast
- Soup and sourdough bread
- Cinnamon raisin toast with butter
- Turkey or chicken sandwiches
- Asiago rosemary toast
- Bruschetta with tomatoes and herbs
The plain loaf is a great everyday bread, while the cinnamon raisin and roasted garlic versions make a special breakfast or weekend treat.
Final Notes
This heritage-style sourdough loaf is all about time, simple ingredients, and good technique. The mix of bread flour and rye gives the loaf a rustic taste, while the long cold ferment adds depth and a pleasant sourdough flavor.
Once you get comfortable with the basic dough, try different add-ins. Cinnamon and raisins make it sweet and warm, while roasted garlic, rosemary, and Asiago create a rich savory loaf.
The best part is that the same base recipe can be used for both versions, so you can make the style you like most.
