
The Perfect Homemade Artisan Sourdough Bread
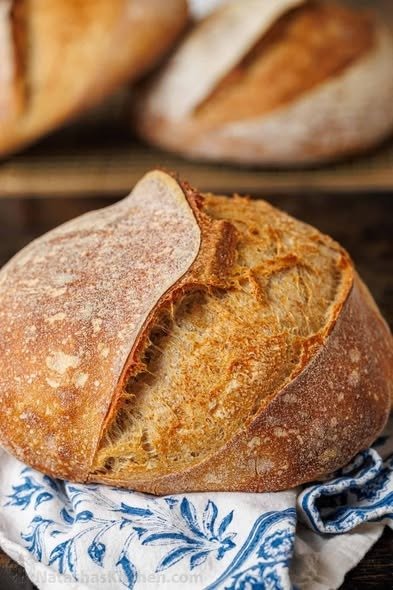
There is something magical about the smell of freshly baked bread filling your kitchen. The golden crust, soft chewy crumb, and rich flavor make homemade sourdough one of the most rewarding baking projects. The bread shown in the image is a beautiful artisan-style sourdough loaf with a crisp crust and rustic appearance. Whether you are a beginner or an experienced baker, this recipe will help you create bakery-quality bread at home.
Sourdough bread has been enjoyed for thousands of years. Unlike commercial bread that relies on instant yeast, sourdough uses a natural starter made from flour and water. This fermentation process develops complex flavors, improves texture, and creates a loaf with a wonderful chewy interior and crunchy crust.
In this blog post, you’ll learn how to make artisan sourdough bread from scratch, along with tips for achieving the perfect rise and crust.
Why You’ll Love This Recipe
- Crispy golden crust
- Soft and airy interior
- Natural fermentation flavor
- No commercial yeast required
- Perfect for sandwiches, toast, or serving alongside soups
The result is a rustic loaf that looks and tastes like it came from a professional bakery.
Ingredients
For the Dough
- 500g bread flour
- 350g water (room temperature)
- 100g active sourdough starter
- 10g salt
Equipment
- Mixing bowl
- Bench scraper
- Dutch oven or baking stone
- Kitchen scale
- Clean kitchen towel
- Proofing basket (optional)
Step 1: Prepare the Dough
In a large mixing bowl, combine the water and active sourdough starter. Stir until the starter is fully dissolved.
Add the bread flour and mix until no dry flour remains. The dough will look rough and shaggy at this stage, which is perfectly normal.
Cover the bowl and let it rest for 30 minutes. This process is called autolyse, which allows the flour to absorb water and helps gluten development.
After the resting period, add the salt and mix thoroughly. You can use your hands to fold and squeeze the dough until the salt is fully incorporated.
Step 2: Bulk Fermentation
Cover the bowl and let the dough ferment at room temperature for 4–6 hours.
During the first two hours, perform a series of stretch-and-folds every 30 minutes.
To do this:
- Wet your hands.
- Grab one side of the dough.
- Stretch it upward.
- Fold it over itself.
- Rotate the bowl and repeat on all four sides.
These folds strengthen the dough and help create an open crumb structure.
As fermentation progresses, you’ll notice the dough becoming smoother, puffier, and more elastic.
Step 3: Shape the Dough
Lightly flour your work surface and gently turn out the dough.
Shape it into a round ball by pulling the edges toward the center and creating surface tension.
Let the dough rest for 20 minutes.
After resting, perform a final shaping by tightening the surface and forming a smooth round loaf.
Place the dough seam-side up in a floured proofing basket or bowl lined with a kitchen towel.
Step 4: Cold Proof
Cover the dough and place it in the refrigerator overnight, ideally for 12–16 hours.
This slow fermentation develops deeper flavor and makes scoring easier before baking.
The next day, your dough should look puffy and slightly expanded.
Step 5: Preheat the Oven
Place a Dutch oven inside your oven and preheat to 250°C (480°F) for at least 45 minutes.
A thoroughly heated Dutch oven creates steam, which helps achieve the beautiful crust seen in artisan loaves.
Step 6: Score the Dough
Carefully remove the dough from the refrigerator and turn it onto parchment paper.
Using a sharp blade or bread lame, make one deep slash across the top of the loaf.
This score allows the bread to expand properly during baking and creates the attractive “ear” often seen on artisan sourdough bread.
Step 7: Bake
Carefully place the dough into the hot Dutch oven.
Cover with the lid and bake for 20 minutes.
After 20 minutes:
- Remove the lid.
- Reduce temperature to 230°C (445°F).
- Bake for another 20–25 minutes.
The loaf should develop a deep golden-brown crust with a crisp exterior.
Step 8: Cool Before Slicing
Once baked, transfer the bread to a wire rack.
Allow it to cool for at least one hour before cutting.
Although it can be tempting to slice into warm bread immediately, cooling allows the crumb structure to set properly and prevents a gummy texture.
Tips for Perfect Sourdough Bread
Use an Active Starter
Your starter should be bubbly, active, and doubled in size before using it in the recipe.
Measure by Weight
Using a kitchen scale ensures accuracy and consistency.
Be Patient
Sourdough fermentation depends on temperature and starter activity. Some days the dough may need more time than others.
Create Steam
If you don’t have a Dutch oven, place a tray of hot water in the oven during baking to generate steam.
Practice Scoring
Scoring improves oven spring and gives your bread a professional appearance.
Serving Suggestions
Fresh sourdough bread pairs beautifully with:
- Butter and honey
- Olive oil and balsamic vinegar
- Soups and stews
- Avocado toast
- Grilled sandwiches
- Cheese boards
Its rich flavor and chewy texture make it versatile for almost any meal.
Storage Instructions
Store the bread at room temperature in a paper bag or bread box for up to three days.
For longer storage:
- Slice the loaf.
- Place slices in a freezer-safe bag.
- Freeze for up to three months.
Toast frozen slices directly from the freezer when needed.
Final Thoughts
Making artisan sourdough bread at home is both an art and a science. While the process takes time, the reward is a loaf with incredible flavor, texture, and appearance. The golden crust, rustic shape, and airy crumb make every slice worth the effort.
With practice, you’ll develop a feel for the dough and learn how fermentation affects the final result. Before long, you’ll be baking beautiful bakery-style sourdough loaves that impress family and friends alike.
Happy baking! 🍞✨
