
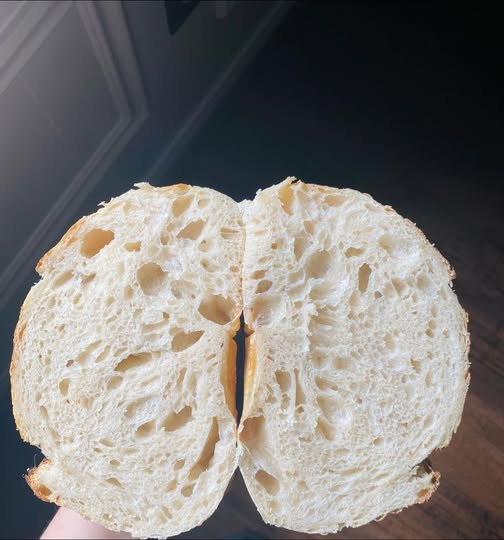
There’s something incredibly satisfying about baking your own sourdough bread from scratch. The crackling crust, the soft and airy interior, and the rich tangy flavor make every loaf feel special. While sourdough may seem intimidating at first, it’s actually a simple process that rewards patience more than perfection. With just a few basic ingredients and a little time, you can create a beautiful artisan loaf that looks and tastes like it came from a professional bakery.
This recipe creates a classic sourdough bread with a golden crust, an open crumb, and deep flavor developed through a slow fermentation process. Whether you are new to sourdough baking or have been nurturing your starter for years, this recipe is reliable, straightforward, and perfect for everyday baking.
Why You’ll Love This Recipe
- Crispy, golden artisan-style crust
- Soft, chewy interior with beautiful air pockets
- Made with only four simple ingredients
- Naturally fermented for incredible flavor
- Perfect for sandwiches, toast, and serving alongside meals
- Easy enough for beginner sourdough bakers
What Makes Sourdough Special?
Unlike commercial yeast breads, sourdough relies on a natural starter made from flour and water. This starter contains wild yeast and beneficial bacteria that slowly ferment the dough. The longer fermentation creates a more complex flavor while also improving texture.
The result is a loaf with a slightly tangy taste, chewy crumb, and rustic appearance that is difficult to achieve with regular bread recipes.
Ingredients
- 125g active sourdough starter
- 350g water
- 525g bread flour
- 10g salt
Ingredient Notes
Active Sourdough Starter:
Your starter should be bubbly, active, and recently fed. A strong starter helps create good rise and texture.
Bread Flour:
Bread flour contains more protein than all-purpose flour, helping create the chewy texture and strong structure sourdough is known for.
Water:
Room-temperature water works best for mixing and fermentation.
Salt:
Salt enhances flavor and helps strengthen the dough structure.
Equipment Needed
- Large mixing bowl
- Dough scraper
- Kitchen scale
- Banneton basket or bowl lined with a towel
- Dutch oven
- Sharp blade or bread lame
- Cooling rack
Step 1: Mix the Dough
In a large mixing bowl, combine the active sourdough starter and water. Stir until the starter is mostly dissolved.
Add the bread flour and salt. Mix everything together until no dry flour remains. The dough will appear rough and shaggy at this stage, which is completely normal.
Cover the bowl and allow the dough to rest for 30 minutes.
This resting period allows the flour to fully hydrate and begins gluten development naturally.
Step 2: Stretch and Fold
After the initial rest, perform your first set of stretch and folds.
To do this:
- Wet your hands lightly.
- Grab one side of the dough.
- Stretch it upward.
- Fold it over itself.
- Rotate the bowl and repeat.
Complete four folds around the bowl.
Repeat this process every 30 minutes for a total of 3–4 sets during the first 1½ to 2 hours.
Each round of folds strengthens the dough and builds structure without intensive kneading.
You’ll notice the dough becoming smoother and more elastic after each set.
Step 3: Bulk Fermentation
Once the stretch-and-fold process is complete, cover the dough and allow it to continue fermenting at room temperature.
The length of fermentation depends on your kitchen temperature and starter strength. In a warm kitchen, this may take around 4–6 hours. Cooler temperatures may require more time.
Look for these signs:
- Dough appears puffy
- Surface becomes smooth
- Volume increases by approximately 50–75%
- Small bubbles are visible throughout
Avoid relying solely on the clock. The appearance of the dough is your best guide.
Step 4: Shape the Dough
Lightly flour your work surface.
Gently turn the dough out onto the counter and shape it into a round.
Allow it to rest for about 15–20 minutes.
Next, perform the final shaping by creating surface tension on the outside of the dough. This helps the loaf maintain its shape during baking.
Place the shaped dough seam-side up into a well-floured banneton basket.
If you don’t have a banneton, a bowl lined with a floured kitchen towel works perfectly.
Step 5: Cold Proof Overnight
Cover the banneton and place it in the refrigerator overnight.
The cold proof serves several important purposes:
- Enhances flavor development
- Makes scoring easier
- Improves oven spring
- Fits conveniently into your schedule
An overnight proof of 12–18 hours generally produces excellent results.
Step 6: Prepare for Baking
The next day, preheat your Dutch oven inside the oven at 450°F (230°C).
Allow the Dutch oven to heat for at least 30–45 minutes.
A thoroughly heated Dutch oven creates steam during baking, which helps produce a crisp crust and beautiful rise.
Carefully remove the dough from the refrigerator.
Turn it onto parchment paper or a lightly floured surface.
Using a sharp bread lame or razor blade, score the top of the loaf with one confident cut.
This score controls where the bread expands during baking.
Step 7: Bake the Bread
Carefully transfer the dough into the hot Dutch oven.
Cover with the lid and bake for:
- 20 minutes covered
Then remove the lid and continue baking:
- 20–25 minutes uncovered
The loaf should develop a rich golden-brown color with a deeply caramelized crust.
The internal temperature should reach approximately 205–210°F (96–99°C).
Step 8: Cool Completely
Remove the bread from the Dutch oven and place it on a cooling rack.
Allow it to cool for at least one hour before slicing.
Although it’s tempting to cut into it immediately, cooling allows the crumb to finish setting properly.
Slicing too early may result in a gummy interior.
Tips for Success
Use an Active Starter
A healthy starter is the foundation of great sourdough. Make sure it doubles in size after feeding before using it in the recipe.
Watch the Dough, Not the Clock
Fermentation times vary depending on temperature, humidity, and starter strength.
Don’t Skip the Cold Proof
The overnight refrigeration significantly improves flavor and handling.
Preheat Thoroughly
A properly heated Dutch oven provides the steam necessary for excellent oven spring.
Let It Cool
Patience is rewarded with better texture and easier slicing.
Serving Ideas
This artisan sourdough bread is delicious:
- Toasted with butter and jam
- Served alongside soups and stews
- Used for gourmet sandwiches
- Paired with olive oil and balsamic vinegar
- Turned into homemade croutons
- Served with cheese boards
Storage
Store the bread at room temperature in a bread bag or wrapped in a clean kitchen towel for up to 3 days.
For longer storage, slice and freeze the loaf. Frozen slices can be toasted directly from the freezer.
Final Thoughts
This classic artisan sourdough bread proves that simple ingredients can create something truly extraordinary. The slow fermentation develops incredible flavor, while the Dutch oven produces that signature bakery-style crust. Once you bake your first successful loaf and hear the crust crackle as it cools, you’ll understand why sourdough has become such a beloved baking tradition. With practice, patience, and a healthy starter, this recipe can become your go-to homemade bread for years to come. 🍞✨
